This post is a long time coming, but better late than never, right? When I graduated from college and moved home (over a year ago), I decided that since I was going to be around for awhile I wanted to a space that reflected my new place in life. My bedroom was still the same room I had in high school, and I wanted something that was a bit more grown up. But since I wasn’t there forever I didn’t want to spend a lot of money, so I set out to DIY and reuse whatever I could. One of those was a DIY-ed duvet cover. I found (and loved) this duvet cover at Urban Outfitters, but didn’t love the price tag for a room I wasn’t going to be living in long term. Not long after I found the original duvet, I ran across a tutorial to DIY my own version. Perfect timing, right? Looking at the tutorial I thought, “how hard could it be?” It looked easy enough, so I set out to make one of my own.

my inspiration
Not having sewed anything since probably 7th grade, I might have gotten myself in over my head with this project, but it ended up turning out pretty well! Fortunately Kiki provided a pretty clear tutorial for how to make the ruffles, so all I had to do was follow her instructions and do a little trial and error to figure it out.
Wanna know how I did it?
Since I have a full size bed, I started with two queen size sheets, and a twin size sheet set that I got on sale to make into ruffles. I cut up (when I say cut, I really mean rip – who wants to do that much cutting?) the sheet set into strips in varying widths and lengths to make into ruffles. Then following this tutorial, and the different methods of making ruffles she describes, I sewed for what seemed like days to make a zillion ruffles.

a zillion ruffles
It took forever to do this, but it was really fun to see the pile of ruffles grow. Once I felt like I had enough ruffles (really, I just got tired), I pinned and sewed them onto one of the sheets in a pattern similar to that of the inspiration, but, at this point I was really just winging it. I had grown tired of the project and wanted it to be done. Once the ruffles were (haphazardly) sewn onto one of the sheets, I pinned the sheets together on three sides to sew them together. Bella wanted to help with this step.

she is such a good helper
I sewed the sheets together on three sides, leaving the bottom open. I learned in this step that sewing in a straight line is definitely not my strong suit. Again, I was winging it. If I had been really ambitious I would have sewn ribbons or string of some kind to tie the bottom closed, but I really didn’t feel like it. You could do that if you wanted to. I would probably recommend it. But only if you want to. Once I got Bella off the sheets and sewed them together, I just kind of shoved a duvet inside, threw it on my bed, and called it good.
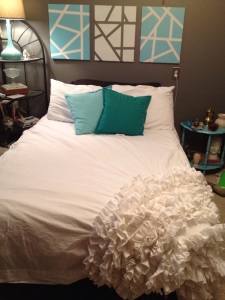
the result!
Is it perfect? Not even close. But for not having sewed (sewn?) anything for at least 10 years, I’m pretty pleased with myself. We won’t look at it too close because you’ll be able to see just how crooked the seams are, but from this distance you can see just how awesome I am at making my own duvet covers. Honestly, I don’t know if I would ever take on a project like this again. I’m really proud of myself, but it was a lot of work. When I was done I was a lot happier with the price tag. I was able to get all of the materials on sale at an after Christmas sale, so it really was pretty cheap to make. Are you impressed? If you’re not, you probably should be. You know what else was cheap and easy to make? Those canvases above my bed. I’ll talk about those soon. In the mean time, please admire my ability to wing it and it not be a total disaster awesome sewing skills.


